
Bankin’ and Bridge launch payment API using bank transfers

French startup Bankin’ has introduced Bridge Pay this week, an API that lets you initiate payments using bank transfers from your app. Think about it as a sort of Stripe, but for bank transfers. The API currently covers 12 major French banks, which represent around 90% of retail bank accounts in France.

Bankin’ is both a B2B and B2C startup. It operates a popular consumer app that lets you aggregate all your bank accounts in a single app. The company has managed to attract 4 million customers with this app. Bankin’ also manages an API called Bridge. Developers can connect directly with bank accounts to fetch transactions and banking information.

With Bridge Pay, the company wants to go one step further and become a payment API as well. The company has been using Bridge Pay within Bankin’ already — customers can transfer money from one bank account to another in the Bankin’ app. Bankin’ users have transferred €1 billion so far.

Third-party companies will now be able to initiate bank transfers themselves. It could be useful for e-commerce companies that sell very expensive items for instance. For example, if you want to buy expensive airplane tickets or a Mac Pro on Apple’s website, you might reach your card transaction limit.

It also opens up a ton of possibilities when it comes to automating B2B transactions without having to interact with your bank account. For instance, payroll services could integrate directly with your company’s bank account to transfer money to your employees.

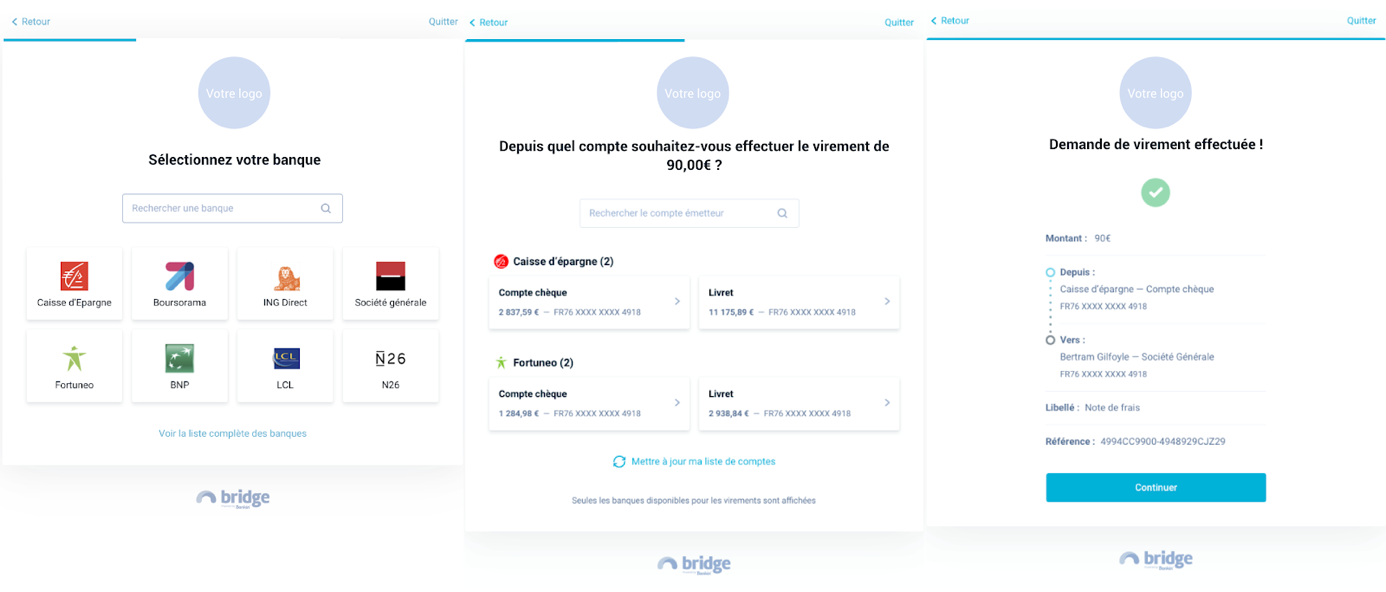
Bridge Pay can be integrated directly in your app or service. When you select payment via bank transfers, you get a list of banks, you then connect to your bank account, choose an account and initiate a payment. Chances are your bank is going to ask you for a confirmation via a text message or a push notification. The company can add more banks in the future without any change in the app.


from TechCrunch https://ift.tt/38Lx9av

Comments

Popular posts from this blog

How To Play Doom – And More – On An NES

Doom was a breakthrough game for its time, and became so popular that now it’s essentially the “Banana For Scale” of hardware hacking. Doom has been ported to countless devices, most of which have enough processing ability to run the game natively. Recently, this lineup of Doom-compatible devices expanded to include the NES even though the system definitely doesn’t have enough capability to run it without special help. And if you want your own Doom NES cartridge, this video will show you how to build it . We featured the original build from [TheRasteri] a while back which goes into details about how it’s possible to run such a resource-intensive game on a comparatively weak system. You just have to enter the cheat code “RASPI”. After all the heavy lifting is done, it’s time to put it into a realistic-looking cartridge. To get everything to fit in the donor cartridge, first the ICs in the cartridge were removed (except the lockout IC) and replaced with custom ROM chips. Some modifica...

The Flexible Permanence of Copper Tape Circuits

Somewhere between shoving components into a breadboard temporarily and committing them to a piece of protoboard or a PCB lies the copper tape method. This flexible Manhattan-style method of circuitry formed the basis for [Bunnie Huang]’s Chibitronics startup, and has since inspired many to stop etching boards and start fetching hoards of copper tape. [Hales] hit the ground running when he learned about this method , and has made many a copper tape circuit in the last year or so. He offers several nice tips on his site that speak from experience with this method, and he’ll even show you how to easily work an SMD breakout board into the mix. Generally speaking, [Hales] prefers plywood as the substrate to paper or cardboard for durability. He starts by drawing out the circuit and planning where all the tape traces will go and how wide they need to be. Then he lays out copper traces and pads, rubs the tape against the substrate to make it adhere strongly, and reinforces joints and laps w...

The Newbie’s Guide To JTAG

Do you even snarf? If not, it might be because you haven’t mastered the basics of JTAG and learned how to dump, or snarf, the firmware of an embedded device. This JTAG primer will get you up to snuff on snarfing, and help you build your reverse engineering skills. Whatever your motivation for diving into reverse engineering devices with microcontrollers, JTAG skills are a must, and [Sergio Prado]’s guide will get you going. He starts with a description and brief history of the Joint Test Action Group interface, from its humble beginnings as a PCB testing standard to the de facto standard for testing, debugging, and flashing firmware onto devices. He covers how to locate the JTAG pads – even when they’ve been purposely obfuscated – including the use of brute-force tools like the JTAGulator . Once you’ve got a connection, his tutorial helps you find the firmware in flash memory and snarf it up to a file for inspection, modification, or whatever else you have planned. We always apprec...