
An Arcade Cabinet with Displays to Spare

We’ve all got a pretty good mental image of what an arcade cabinet looks like, so you probably don’t need to be reminded that traditionally they are single-screen affairs. But that idea dates back to when they were built around big and bulky CRT displays. Now that we have modern LCD, LED, and OLED panels, who says you have to follow the old rules?

That’s precisely the sort of out of the box thinking that lead [Al Linke] to build this unique multi-display arcade cabinet. The game itself is still played on a single screen, but several smaller sub-displays are dotted all around the cabinet to indicate various bits of ancillary information. Are they necessary? Hardly. But we can’t deny it’s a clever idea, and we wouldn’t be surprised if we start seeing something similar in other DIY cabinets.

The build started with a commercially available cabinet from Arcade1Up, which at this point are popular enough that some of the Big Box retailers have them in stock. All of the electronics except for the display were stripped out, and replaced with a Dell OptiPlex 9020 computer and high-quality joysticks and buttons. [Al] then installed his various displays all over the cabinet, including a gorgeous LED marquee that we’ve featured previously.

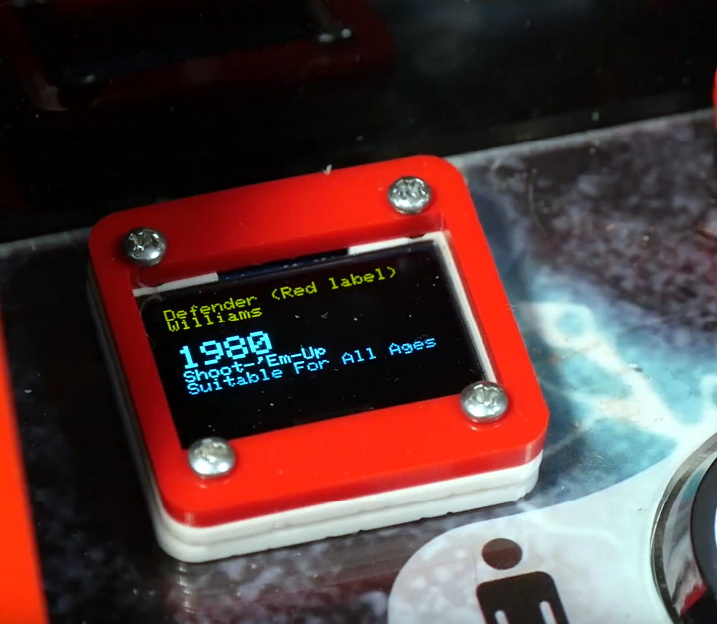
So what do all these little screens do? [Al] explains them in the video after the break, but the general idea is that they provide contextual information about the game you currently have loaded up. A two-color OLED display shows the name of the game and what it’s rated, while a seven segment LED display shows the year the game was released. The displays are located both by the controls and where you’d expect the coin slot to be, so whether you’re actively playing or across the room, you can see all the information.

We’re always amazed to see how builders find ways to make their own personal arcade cabinets stand out. While it’s an idea that at this point we’ve seen quite a lot of, no two projects have ever been quite the same.


from Hackaday https://ift.tt/2GMGkva

Comments

Popular posts from this blog

How To Play Doom – And More – On An NES

Doom was a breakthrough game for its time, and became so popular that now it’s essentially the “Banana For Scale” of hardware hacking. Doom has been ported to countless devices, most of which have enough processing ability to run the game natively. Recently, this lineup of Doom-compatible devices expanded to include the NES even though the system definitely doesn’t have enough capability to run it without special help. And if you want your own Doom NES cartridge, this video will show you how to build it . We featured the original build from [TheRasteri] a while back which goes into details about how it’s possible to run such a resource-intensive game on a comparatively weak system. You just have to enter the cheat code “RASPI”. After all the heavy lifting is done, it’s time to put it into a realistic-looking cartridge. To get everything to fit in the donor cartridge, first the ICs in the cartridge were removed (except the lockout IC) and replaced with custom ROM chips. Some modifica...

Try NopSCADlib for your Next OpenSCAD Project

Most readers of this site are familiar by now with the OpenSCAD 3D modeling software, where you can write code to create 3D models. You may have even used OpenSCAD to output some STL files for your 3D printer. But for years now, [nophead] has been pushing OpenSCAD further than most, creating some complex utility and parts libraries to help with modeling, and a suite of Python scripts that generate printable STLs, laser-ready DXFs, bills of material, and human-readable assembly instructions complete with PNG imagery of exploded-view sub-assemblies. Recently [nophead] tidied all of this OpenSCAD infrastructure up and released it on GitHub as NopSCADlib . You can find out more by browsing through the example projects and README file in the repository, and by reading the announcement blog post on the HydraRaptor blog . Some functionality highlights include: a large parts library full of motors, buttons, smooth rod, et cetera many utility functions to help with chamfers, fillets, precis...

The Newbie’s Guide To JTAG

Do you even snarf? If not, it might be because you haven’t mastered the basics of JTAG and learned how to dump, or snarf, the firmware of an embedded device. This JTAG primer will get you up to snuff on snarfing, and help you build your reverse engineering skills. Whatever your motivation for diving into reverse engineering devices with microcontrollers, JTAG skills are a must, and [Sergio Prado]’s guide will get you going. He starts with a description and brief history of the Joint Test Action Group interface, from its humble beginnings as a PCB testing standard to the de facto standard for testing, debugging, and flashing firmware onto devices. He covers how to locate the JTAG pads – even when they’ve been purposely obfuscated – including the use of brute-force tools like the JTAGulator . Once you’ve got a connection, his tutorial helps you find the firmware in flash memory and snarf it up to a file for inspection, modification, or whatever else you have planned. We always apprec...