
Peek Inside These Same-But-Different Power Supplies

When [Kerry Wong] found an Amrel PPS 35-2 Programmable Power Supply from the late 90s on eBay, he recognized it as the single-channel version of another unit he owned, the dual-channel Amrel PPS-2322. Naturally, he purchased it and did a compare and contrast of the two models.

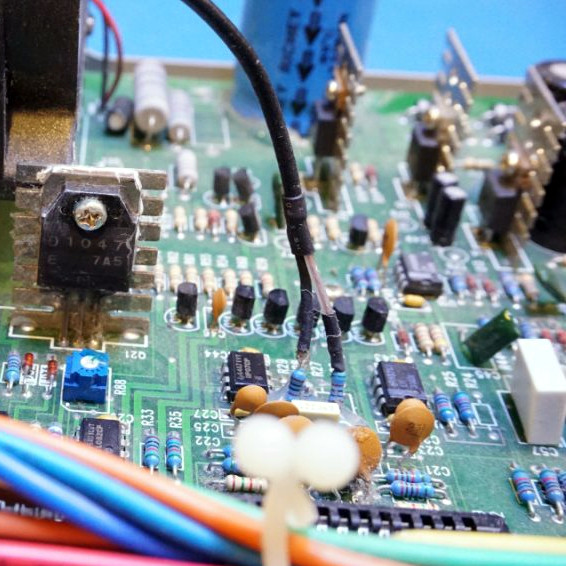
From the outside, they look fairly different but weigh about the same. But the similarities on the inside make it quite clear that they share a common design. There are a few things that grab your eye and the 35-2 doesn’t seem quite as well thought out, with some components being soldered into awkward-looking places. Capacitors bristle like barnacles where they are soldered directly to a connector, and a blob of hot glue anchors two resistors that rise up out of the board like a couple of weeds.

The link above shows some high resolution side-by-side photos between the two models, and [Kerry] thoughtfully provides a link to the manual for the PPS series as well as a dump of the firmware (.zip) for the 35-2. A teardown video is embedded below.

Benchtop power supplies are important tools, but we’ve also seen how modern breadboard power supplies are remarkably full-featured.


from Hackaday https://ift.tt/39jVXHJ

Comments

Popular posts from this blog

How To Play Doom – And More – On An NES

Doom was a breakthrough game for its time, and became so popular that now it’s essentially the “Banana For Scale” of hardware hacking. Doom has been ported to countless devices, most of which have enough processing ability to run the game natively. Recently, this lineup of Doom-compatible devices expanded to include the NES even though the system definitely doesn’t have enough capability to run it without special help. And if you want your own Doom NES cartridge, this video will show you how to build it . We featured the original build from [TheRasteri] a while back which goes into details about how it’s possible to run such a resource-intensive game on a comparatively weak system. You just have to enter the cheat code “RASPI”. After all the heavy lifting is done, it’s time to put it into a realistic-looking cartridge. To get everything to fit in the donor cartridge, first the ICs in the cartridge were removed (except the lockout IC) and replaced with custom ROM chips. Some modifica...

Try NopSCADlib for your Next OpenSCAD Project

Most readers of this site are familiar by now with the OpenSCAD 3D modeling software, where you can write code to create 3D models. You may have even used OpenSCAD to output some STL files for your 3D printer. But for years now, [nophead] has been pushing OpenSCAD further than most, creating some complex utility and parts libraries to help with modeling, and a suite of Python scripts that generate printable STLs, laser-ready DXFs, bills of material, and human-readable assembly instructions complete with PNG imagery of exploded-view sub-assemblies. Recently [nophead] tidied all of this OpenSCAD infrastructure up and released it on GitHub as NopSCADlib . You can find out more by browsing through the example projects and README file in the repository, and by reading the announcement blog post on the HydraRaptor blog . Some functionality highlights include: a large parts library full of motors, buttons, smooth rod, et cetera many utility functions to help with chamfers, fillets, precis...

The Newbie’s Guide To JTAG

Do you even snarf? If not, it might be because you haven’t mastered the basics of JTAG and learned how to dump, or snarf, the firmware of an embedded device. This JTAG primer will get you up to snuff on snarfing, and help you build your reverse engineering skills. Whatever your motivation for diving into reverse engineering devices with microcontrollers, JTAG skills are a must, and [Sergio Prado]’s guide will get you going. He starts with a description and brief history of the Joint Test Action Group interface, from its humble beginnings as a PCB testing standard to the de facto standard for testing, debugging, and flashing firmware onto devices. He covers how to locate the JTAG pads – even when they’ve been purposely obfuscated – including the use of brute-force tools like the JTAGulator . Once you’ve got a connection, his tutorial helps you find the firmware in flash memory and snarf it up to a file for inspection, modification, or whatever else you have planned. We always apprec...