
LED Flame Illuminates the Beauty of Noise

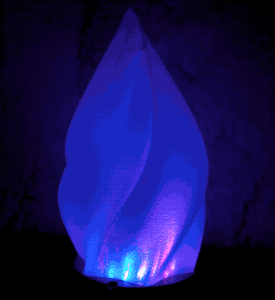
Have you ever wrapped up a nice blinky project only to be disappointed by the predictability of the light or the color patterns? When it came to lighting this LED candle, so was [fungus amungus]. But there’s a better way, and it involves noise.

Perlin noise was created in the early 80s by Ken Perlin while he was working on the movie Tron. Frustrated by the current state of computer graphics and too limited on space to use images, he devised an algorithm for generating natural-looking textures. Basically, you generate a bunch of numbers between 0 and 1, then assign values to those numbers, such as a range of greyscale values from black (0) to white (1), or the values from the color wheel. The result is much prettier than random numbers because the neighboring values for any given number aren’t radically different. You get nice randomness with hardly any overhead.

[fungus amungus] is using the FastLED’s noise function to generate the numbers, but there’s a whole lot more going on here. As he explains in the excellent video after the break, if you want to animate these values, you just add another dimension of them. Although [fungus amungus] is using a Trinket Pro and a NeoPixel ring, we think a simplified version could be done with a Circuit Playground Express using the built-in LEDs.

If you want to do it the hard way, start by making your own NeoPixel ring.


from Hackaday https://ift.tt/365JaGZ

Comments

Popular posts from this blog

How To Play Doom – And More – On An NES

Doom was a breakthrough game for its time, and became so popular that now it’s essentially the “Banana For Scale” of hardware hacking. Doom has been ported to countless devices, most of which have enough processing ability to run the game natively. Recently, this lineup of Doom-compatible devices expanded to include the NES even though the system definitely doesn’t have enough capability to run it without special help. And if you want your own Doom NES cartridge, this video will show you how to build it . We featured the original build from [TheRasteri] a while back which goes into details about how it’s possible to run such a resource-intensive game on a comparatively weak system. You just have to enter the cheat code “RASPI”. After all the heavy lifting is done, it’s time to put it into a realistic-looking cartridge. To get everything to fit in the donor cartridge, first the ICs in the cartridge were removed (except the lockout IC) and replaced with custom ROM chips. Some modifica...

The Flexible Permanence of Copper Tape Circuits

Somewhere between shoving components into a breadboard temporarily and committing them to a piece of protoboard or a PCB lies the copper tape method. This flexible Manhattan-style method of circuitry formed the basis for [Bunnie Huang]’s Chibitronics startup, and has since inspired many to stop etching boards and start fetching hoards of copper tape. [Hales] hit the ground running when he learned about this method , and has made many a copper tape circuit in the last year or so. He offers several nice tips on his site that speak from experience with this method, and he’ll even show you how to easily work an SMD breakout board into the mix. Generally speaking, [Hales] prefers plywood as the substrate to paper or cardboard for durability. He starts by drawing out the circuit and planning where all the tape traces will go and how wide they need to be. Then he lays out copper traces and pads, rubs the tape against the substrate to make it adhere strongly, and reinforces joints and laps w...

The Newbie’s Guide To JTAG

Do you even snarf? If not, it might be because you haven’t mastered the basics of JTAG and learned how to dump, or snarf, the firmware of an embedded device. This JTAG primer will get you up to snuff on snarfing, and help you build your reverse engineering skills. Whatever your motivation for diving into reverse engineering devices with microcontrollers, JTAG skills are a must, and [Sergio Prado]’s guide will get you going. He starts with a description and brief history of the Joint Test Action Group interface, from its humble beginnings as a PCB testing standard to the de facto standard for testing, debugging, and flashing firmware onto devices. He covers how to locate the JTAG pads – even when they’ve been purposely obfuscated – including the use of brute-force tools like the JTAGulator . Once you’ve got a connection, his tutorial helps you find the firmware in flash memory and snarf it up to a file for inspection, modification, or whatever else you have planned. We always apprec...