
Robotic Eels Take Care of Undersea Pipelines

We can’t tell if the Eelume actually exists, or if it’s just a good CG and a design concept, but when we saw the video below, we wanted to start working on our version of it immediately. What’s an Eelume? A robotic eel that lives permanently under the ocean.

If you have to take care of something underwater — like a pipeline — this could be much more cost-effective than sending divers to the ocean floor. We liked the natural motion and we really liked the way the unit could switch batteries and tool heads.

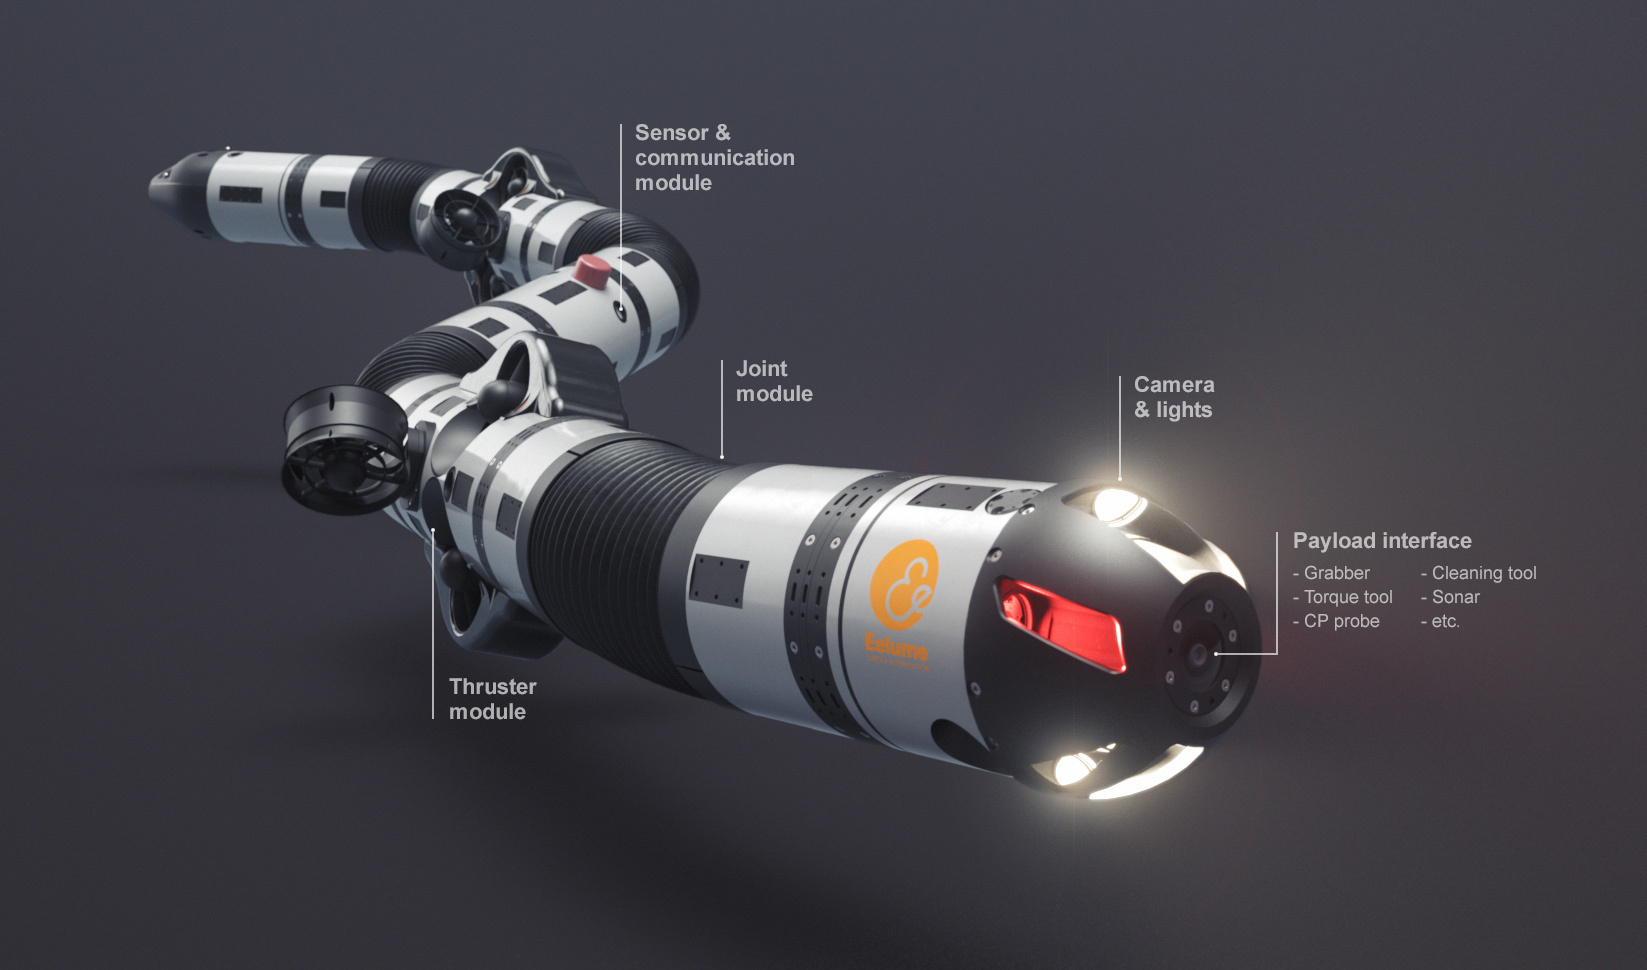
We do have some questions, though. How do you get rid of one battery and pick up another? There would have to be some battery capacity that doesn’t exchange, but that’s not very efficient since the new battery would have to recharge the internal battery. Perhaps you can add batteries at either end. Some of the still pictures don’t clearly show how the batteries fit in, although they do show the flexible joints, sensors, cameras, and thrusters, which are all modular.

According to the web site, tools can go on either end and there’s a robot arm. The device can apparently shape itself like a U to bring both ends to bear on the same area. Generally, we like robots that mimic nature, but this is one of the best examples of that being practical we’ve seen.

There’s a video on the site of what appears to be real hardware tethered in a swimming pool, though we couldn’t tell how much of the device was subject to remote control and how much would be autonomous. Communicating underwater is finicky and usually requires either an antenna on the surface or a very low frequency (and, thus, not much bandwidth). While completely duplicating this would probably be a feat, it might inspire some hacker-friendly eels.

A lot of underwater vehicles seem to emulate biologic life. Shape-wise we had to remember [Alex Williams’] award-winning underwater glider, even though it doesn’t undulate.


from Hackaday https://ift.tt/2vob2sB

Comments

Popular posts from this blog

How To Play Doom – And More – On An NES

Doom was a breakthrough game for its time, and became so popular that now it’s essentially the “Banana For Scale” of hardware hacking. Doom has been ported to countless devices, most of which have enough processing ability to run the game natively. Recently, this lineup of Doom-compatible devices expanded to include the NES even though the system definitely doesn’t have enough capability to run it without special help. And if you want your own Doom NES cartridge, this video will show you how to build it . We featured the original build from [TheRasteri] a while back which goes into details about how it’s possible to run such a resource-intensive game on a comparatively weak system. You just have to enter the cheat code “RASPI”. After all the heavy lifting is done, it’s time to put it into a realistic-looking cartridge. To get everything to fit in the donor cartridge, first the ICs in the cartridge were removed (except the lockout IC) and replaced with custom ROM chips. Some modifica...

The Flexible Permanence of Copper Tape Circuits

Somewhere between shoving components into a breadboard temporarily and committing them to a piece of protoboard or a PCB lies the copper tape method. This flexible Manhattan-style method of circuitry formed the basis for [Bunnie Huang]’s Chibitronics startup, and has since inspired many to stop etching boards and start fetching hoards of copper tape. [Hales] hit the ground running when he learned about this method , and has made many a copper tape circuit in the last year or so. He offers several nice tips on his site that speak from experience with this method, and he’ll even show you how to easily work an SMD breakout board into the mix. Generally speaking, [Hales] prefers plywood as the substrate to paper or cardboard for durability. He starts by drawing out the circuit and planning where all the tape traces will go and how wide they need to be. Then he lays out copper traces and pads, rubs the tape against the substrate to make it adhere strongly, and reinforces joints and laps w...

The Newbie’s Guide To JTAG

Do you even snarf? If not, it might be because you haven’t mastered the basics of JTAG and learned how to dump, or snarf, the firmware of an embedded device. This JTAG primer will get you up to snuff on snarfing, and help you build your reverse engineering skills. Whatever your motivation for diving into reverse engineering devices with microcontrollers, JTAG skills are a must, and [Sergio Prado]’s guide will get you going. He starts with a description and brief history of the Joint Test Action Group interface, from its humble beginnings as a PCB testing standard to the de facto standard for testing, debugging, and flashing firmware onto devices. He covers how to locate the JTAG pads – even when they’ve been purposely obfuscated – including the use of brute-force tools like the JTAGulator . Once you’ve got a connection, his tutorial helps you find the firmware in flash memory and snarf it up to a file for inspection, modification, or whatever else you have planned. We always apprec...