
3D Printed Parts Keep Respirators Operational During COVID-19 Epidemic

COVID-19 can seem like a paper tiger, when looking at bare mortality rates. The far greater problem is the increase in fatalities as health systems are stretched to the limit. With thousands of patients presenting all at once, hospitals quickly run out of beds and resources and suddenly, normally survivable conditions become life threatening. One Italian hospital found themselves in such a position, running out of valves for a critical respirator device needed to save their patients. Supplies were running out – but additive manufacturing was able to save the day.

The original part, left, with its 3D-printed replacement.

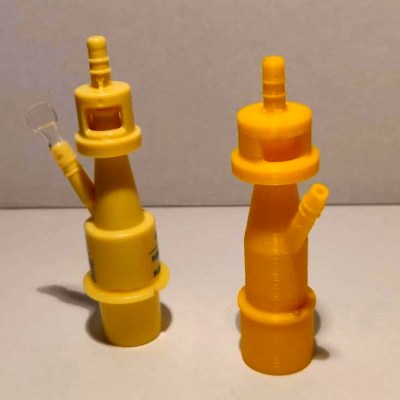
While the article uses the term “reanimation device”, it’s clear we’re talking about respirators here, necessary to keep patients alive during respiratory distress. The valve in question is a plastic part, one which likely needs to be changed over when the device is used with each individual patient to provide a sterile flow of air. After the alarm was raised by Nunzia Vallini, a local journalist, a ring around of the 3D printing community led to a machine being sent down to the hospital and the parts being reproduced. Once proven to work, things were stepped up, with another company stepping in to produce the parts in quantity with a high-quality laser fusion printer.

It’s a great example of 3D printers being used to produce actual useful parts, and of the community coming together to do vital lifesaving work. We’ve seen the technology come in clutch in the medical field before, too. Stay safe out there, and live to hack another day.

Thanks to [Jarno Burger], [LuigiBrotha], and [Michael Hartmann] for the tips!


from Hackaday https://ift.tt/38NaIkU

Comments

Popular posts from this blog

How To Play Doom – And More – On An NES

Doom was a breakthrough game for its time, and became so popular that now it’s essentially the “Banana For Scale” of hardware hacking. Doom has been ported to countless devices, most of which have enough processing ability to run the game natively. Recently, this lineup of Doom-compatible devices expanded to include the NES even though the system definitely doesn’t have enough capability to run it without special help. And if you want your own Doom NES cartridge, this video will show you how to build it . We featured the original build from [TheRasteri] a while back which goes into details about how it’s possible to run such a resource-intensive game on a comparatively weak system. You just have to enter the cheat code “RASPI”. After all the heavy lifting is done, it’s time to put it into a realistic-looking cartridge. To get everything to fit in the donor cartridge, first the ICs in the cartridge were removed (except the lockout IC) and replaced with custom ROM chips. Some modifica...

The Flexible Permanence of Copper Tape Circuits

Somewhere between shoving components into a breadboard temporarily and committing them to a piece of protoboard or a PCB lies the copper tape method. This flexible Manhattan-style method of circuitry formed the basis for [Bunnie Huang]’s Chibitronics startup, and has since inspired many to stop etching boards and start fetching hoards of copper tape. [Hales] hit the ground running when he learned about this method , and has made many a copper tape circuit in the last year or so. He offers several nice tips on his site that speak from experience with this method, and he’ll even show you how to easily work an SMD breakout board into the mix. Generally speaking, [Hales] prefers plywood as the substrate to paper or cardboard for durability. He starts by drawing out the circuit and planning where all the tape traces will go and how wide they need to be. Then he lays out copper traces and pads, rubs the tape against the substrate to make it adhere strongly, and reinforces joints and laps w...

The Newbie’s Guide To JTAG

Do you even snarf? If not, it might be because you haven’t mastered the basics of JTAG and learned how to dump, or snarf, the firmware of an embedded device. This JTAG primer will get you up to snuff on snarfing, and help you build your reverse engineering skills. Whatever your motivation for diving into reverse engineering devices with microcontrollers, JTAG skills are a must, and [Sergio Prado]’s guide will get you going. He starts with a description and brief history of the Joint Test Action Group interface, from its humble beginnings as a PCB testing standard to the de facto standard for testing, debugging, and flashing firmware onto devices. He covers how to locate the JTAG pads – even when they’ve been purposely obfuscated – including the use of brute-force tools like the JTAGulator . Once you’ve got a connection, his tutorial helps you find the firmware in flash memory and snarf it up to a file for inspection, modification, or whatever else you have planned. We always apprec...