
Media Streamer With E-Ink Display Keeps it Classy

The Logitech SqueezeBox was a device you hooked up to your stereo so you could stream music from a Network Attached Storage (NAS) box or your desktop computer over the network. That might not sound very exciting now, but when [Aaron Ciuffo] bought it back in 2006, it was a pretty big deal. The little gadget has been chugging all these years, but the cracks are starting to form. Before it finally heads to that great electronics recycling center in the sky, he’s decided to start work on its replacement.

Thanks to the Raspberry Pi, building a little device to stream digital audio from a NAS is easy these days. But a Pi hooked up to a USB speaker isn’t necessarily a great fit for the living room. [Aaron] didn’t necessarily want his replacement player to actually look like the SqueezeBox, but he wanted it to be presentable. While most of us probably would have tried to make something that looked like a traditional piece of audio gear, he took his design is a somewhat more homey direction.

An OpenSCAD render of the enclosure.

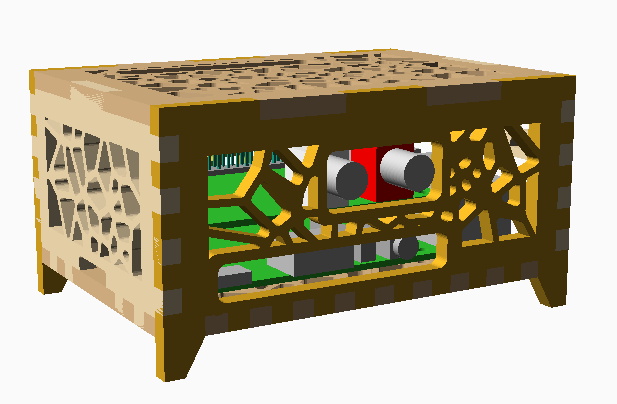
The Raspberry Pi 4 and HiFiBerry DAC+ Pro live inside of a wooden laser cut case that [Aaron] designed with OpenSCAD. We generally associate this tool with 3D printing, but here he’s exporting each individual panel as an SVG file so they can be cut out. We especially like that he took the time to add all of the internal components to the render so he could be sure everything fit before bringing the design into the corporeal world.

While the case was definitely a step in the right direction, [Aaron] wasn’t done yet. He added a WaveShare e-Paper 5.83″ display and mounted it in a picture frame. Software he’s written for the Raspberry Pi shows the album information and cover art on the display while the music is playing, and the current time and weather forecast when it’s idle. He’s written the software to plug into Logitech’s media player back-end to retain compatibility with the not-quite-dead-yet SqueezeBox, but we imagine the code could be adapted to whatever digital media scheme you’re using.

Over the years, we’ve seen a number of SqueezeBox replacements. Many of which have been powered by the Raspberry Pi, but even the ESP8266 and ESP32 have gotten in on the action recently.


from Hackaday https://ift.tt/2TpKAa6

Comments

Popular posts from this blog

How To Play Doom – And More – On An NES

Doom was a breakthrough game for its time, and became so popular that now it’s essentially the “Banana For Scale” of hardware hacking. Doom has been ported to countless devices, most of which have enough processing ability to run the game natively. Recently, this lineup of Doom-compatible devices expanded to include the NES even though the system definitely doesn’t have enough capability to run it without special help. And if you want your own Doom NES cartridge, this video will show you how to build it . We featured the original build from [TheRasteri] a while back which goes into details about how it’s possible to run such a resource-intensive game on a comparatively weak system. You just have to enter the cheat code “RASPI”. After all the heavy lifting is done, it’s time to put it into a realistic-looking cartridge. To get everything to fit in the donor cartridge, first the ICs in the cartridge were removed (except the lockout IC) and replaced with custom ROM chips. Some modifica...

The Flexible Permanence of Copper Tape Circuits

Somewhere between shoving components into a breadboard temporarily and committing them to a piece of protoboard or a PCB lies the copper tape method. This flexible Manhattan-style method of circuitry formed the basis for [Bunnie Huang]’s Chibitronics startup, and has since inspired many to stop etching boards and start fetching hoards of copper tape. [Hales] hit the ground running when he learned about this method , and has made many a copper tape circuit in the last year or so. He offers several nice tips on his site that speak from experience with this method, and he’ll even show you how to easily work an SMD breakout board into the mix. Generally speaking, [Hales] prefers plywood as the substrate to paper or cardboard for durability. He starts by drawing out the circuit and planning where all the tape traces will go and how wide they need to be. Then he lays out copper traces and pads, rubs the tape against the substrate to make it adhere strongly, and reinforces joints and laps w...

The Newbie’s Guide To JTAG

Do you even snarf? If not, it might be because you haven’t mastered the basics of JTAG and learned how to dump, or snarf, the firmware of an embedded device. This JTAG primer will get you up to snuff on snarfing, and help you build your reverse engineering skills. Whatever your motivation for diving into reverse engineering devices with microcontrollers, JTAG skills are a must, and [Sergio Prado]’s guide will get you going. He starts with a description and brief history of the Joint Test Action Group interface, from its humble beginnings as a PCB testing standard to the de facto standard for testing, debugging, and flashing firmware onto devices. He covers how to locate the JTAG pads – even when they’ve been purposely obfuscated – including the use of brute-force tools like the JTAGulator . Once you’ve got a connection, his tutorial helps you find the firmware in flash memory and snarf it up to a file for inspection, modification, or whatever else you have planned. We always apprec...