
Amstrad Portable Gets A Modern LCD Transplant

Playing classic games on the real hardware is an experience many of us enjoy, but sometimes the hardware is just a bit too retro for modern sensibilities. A case in point is the miserable monochrome LCD that was originally installed in the Amstrad PPC640 portable 8086 PC that [Drygol] recently picked up. He decided that his portable Amstrad sessions would be far more enjoyable if he swapped it out for a display that didn’t have 30+ years on the clock.

To quell the complaints of any of the vintage hardware aficionados out there, it’s worth mentioning that the original LCD was actually damaged and needed to be replaced anyway. Granted [Drygol] could have tried to find a contemporary panel to replace it with, but looking at the incredible before and after shots of the modded PPC640, it’s hard to argue he didn’t make the right decision by throwing a modern display into the otherwise largely original computer.

Getting the new LCD’s PCB ready for installation.

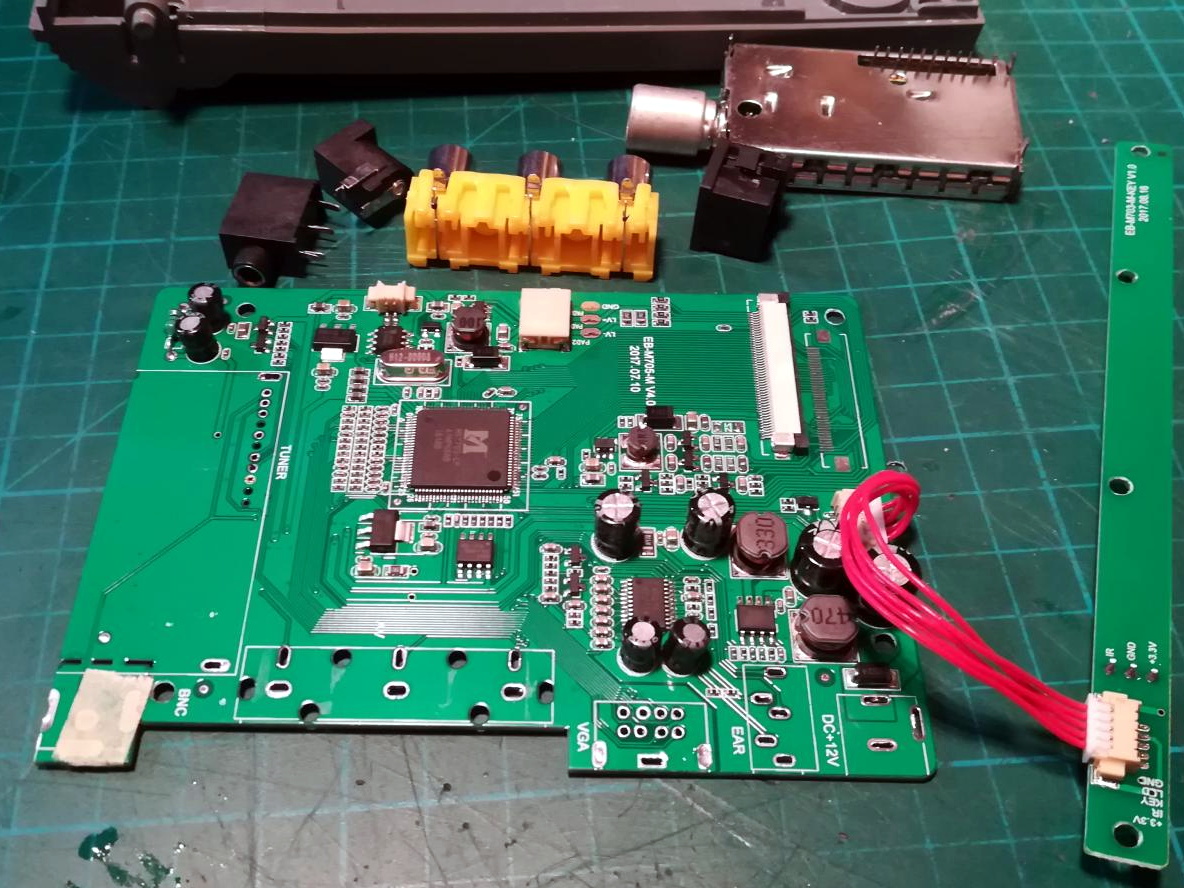
[Drygol] says he picked up a cheap 4:3 LCD TV on eBay, and as luck would have it, found that the new panel dropped perfectly into the original frame. Getting it buttoned back up required the removal of the RF can and all the female connections on the TV’s PCB, plus he had to cut some holes in the back of the display enclosure to mount the LCD’s controls, but overall it looks very stock.

Of course, getting the new LCD display in the original frame was only half the battle, it still needs to be connected up to the computer somehow. To get everyone playing nicely with each other, [Drygol] is using a commercially available MDA/CGA/EGA to VGA converter that is installed where the batteries would have gone originally. Wired to the PPC640’s external monitor connector, it allows him to drive the new display without having to use the original LCD interface.

[Drygol] has made something of a name for himself by performing some of the most impressive restorations and modifications of retro hardware in recent memory. From the unbelievable work that went into repairing a smashed Atari 800XL case to his gorgeous custom Amiga A500, his projects are sure to please the retro hardware lovers in the audience.


from Hackaday https://ift.tt/2WqyaQo

Comments

Popular posts from this blog

How To Play Doom – And More – On An NES

Doom was a breakthrough game for its time, and became so popular that now it’s essentially the “Banana For Scale” of hardware hacking. Doom has been ported to countless devices, most of which have enough processing ability to run the game natively. Recently, this lineup of Doom-compatible devices expanded to include the NES even though the system definitely doesn’t have enough capability to run it without special help. And if you want your own Doom NES cartridge, this video will show you how to build it . We featured the original build from [TheRasteri] a while back which goes into details about how it’s possible to run such a resource-intensive game on a comparatively weak system. You just have to enter the cheat code “RASPI”. After all the heavy lifting is done, it’s time to put it into a realistic-looking cartridge. To get everything to fit in the donor cartridge, first the ICs in the cartridge were removed (except the lockout IC) and replaced with custom ROM chips. Some modifica...

The Flexible Permanence of Copper Tape Circuits

Somewhere between shoving components into a breadboard temporarily and committing them to a piece of protoboard or a PCB lies the copper tape method. This flexible Manhattan-style method of circuitry formed the basis for [Bunnie Huang]’s Chibitronics startup, and has since inspired many to stop etching boards and start fetching hoards of copper tape. [Hales] hit the ground running when he learned about this method , and has made many a copper tape circuit in the last year or so. He offers several nice tips on his site that speak from experience with this method, and he’ll even show you how to easily work an SMD breakout board into the mix. Generally speaking, [Hales] prefers plywood as the substrate to paper or cardboard for durability. He starts by drawing out the circuit and planning where all the tape traces will go and how wide they need to be. Then he lays out copper traces and pads, rubs the tape against the substrate to make it adhere strongly, and reinforces joints and laps w...

The Newbie’s Guide To JTAG

Do you even snarf? If not, it might be because you haven’t mastered the basics of JTAG and learned how to dump, or snarf, the firmware of an embedded device. This JTAG primer will get you up to snuff on snarfing, and help you build your reverse engineering skills. Whatever your motivation for diving into reverse engineering devices with microcontrollers, JTAG skills are a must, and [Sergio Prado]’s guide will get you going. He starts with a description and brief history of the Joint Test Action Group interface, from its humble beginnings as a PCB testing standard to the de facto standard for testing, debugging, and flashing firmware onto devices. He covers how to locate the JTAG pads – even when they’ve been purposely obfuscated – including the use of brute-force tools like the JTAGulator . Once you’ve got a connection, his tutorial helps you find the firmware in flash memory and snarf it up to a file for inspection, modification, or whatever else you have planned. We always apprec...