
USB Armory MkII: A USB-C Thumb Drive Based Linux Computer for Pentesters

While it might look like a disrobed flash drive or RTL-SDR dongle, the USB Armory Mk II is actually a full-fledged open hardware computer built into the ubiquitous USB “stick” format. But more than just that, it’s optimized for security research and boasts a list of features that are sure to get the attention of any pentesters in the audience. Fine tuned thanks to the feedback developer [Inverse Path] received about the original version of the hardware, the Mk II promises to be the last word in secure mobile computing.

Compared to the original hardware, the most obvious change is the switch to USB-C. The previous USB Armory used traces on the PCB to plug directly into a USB Type-A port, but this time around [Inverse Path] has put a proper male connector on the front of the board. Nominally, the USB Armory is plugged into a host computer to provide it with power and a network connection, though it also has the ability to disguise itself as a storage or input device for more stealthy applications. There’s also a female USB-C port on the Mk II, which can be used to connect additional devices, a feature the previous version lacked.

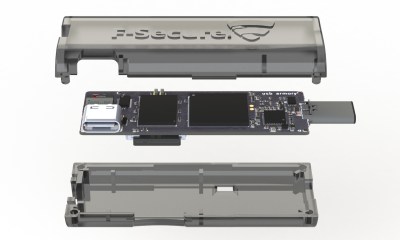
The USB Armory Mk II is powered by an upgraded 900 MHz ARM Cortex-A7 processor, though it retains the same 512 MB of RAM from the previous version. Like the original, there’s a micro SD slot to hold the Linux operating system, but this time it’s supplemented with an onboard 16 GB eMMC chip. There’s even a physical switch that allows the user to choose which storage device they want to boot from. Other additions for the Mk II include Bluetooth connectivity, and a hardware true random number generator (TRNG).

We first brought you word of the original USB Armory back in 2014, and it’s always good to see an open hardware project thriving and iterating years later. While the $149 price tag arguably puts the MKII out of the tinkering budget for many of us, there’s clearly a market for niche devices like this and we can’t wait to see what [Inverse Path] comes up with next.


from Hackaday https://ift.tt/2ovenm5

Comments

Popular posts from this blog

How To Play Doom – And More – On An NES

Doom was a breakthrough game for its time, and became so popular that now it’s essentially the “Banana For Scale” of hardware hacking. Doom has been ported to countless devices, most of which have enough processing ability to run the game natively. Recently, this lineup of Doom-compatible devices expanded to include the NES even though the system definitely doesn’t have enough capability to run it without special help. And if you want your own Doom NES cartridge, this video will show you how to build it . We featured the original build from [TheRasteri] a while back which goes into details about how it’s possible to run such a resource-intensive game on a comparatively weak system. You just have to enter the cheat code “RASPI”. After all the heavy lifting is done, it’s time to put it into a realistic-looking cartridge. To get everything to fit in the donor cartridge, first the ICs in the cartridge were removed (except the lockout IC) and replaced with custom ROM chips. Some modifica...

The Flexible Permanence of Copper Tape Circuits

Somewhere between shoving components into a breadboard temporarily and committing them to a piece of protoboard or a PCB lies the copper tape method. This flexible Manhattan-style method of circuitry formed the basis for [Bunnie Huang]’s Chibitronics startup, and has since inspired many to stop etching boards and start fetching hoards of copper tape. [Hales] hit the ground running when he learned about this method , and has made many a copper tape circuit in the last year or so. He offers several nice tips on his site that speak from experience with this method, and he’ll even show you how to easily work an SMD breakout board into the mix. Generally speaking, [Hales] prefers plywood as the substrate to paper or cardboard for durability. He starts by drawing out the circuit and planning where all the tape traces will go and how wide they need to be. Then he lays out copper traces and pads, rubs the tape against the substrate to make it adhere strongly, and reinforces joints and laps w...

The Newbie’s Guide To JTAG

Do you even snarf? If not, it might be because you haven’t mastered the basics of JTAG and learned how to dump, or snarf, the firmware of an embedded device. This JTAG primer will get you up to snuff on snarfing, and help you build your reverse engineering skills. Whatever your motivation for diving into reverse engineering devices with microcontrollers, JTAG skills are a must, and [Sergio Prado]’s guide will get you going. He starts with a description and brief history of the Joint Test Action Group interface, from its humble beginnings as a PCB testing standard to the de facto standard for testing, debugging, and flashing firmware onto devices. He covers how to locate the JTAG pads – even when they’ve been purposely obfuscated – including the use of brute-force tools like the JTAGulator . Once you’ve got a connection, his tutorial helps you find the firmware in flash memory and snarf it up to a file for inspection, modification, or whatever else you have planned. We always apprec...