We’ve seen countless different robot kits promoted for STEM education, every one of which can perform the robotic “Hello World” task of line following. Many were in attendance at Maker Faire Bay Area 2019 toiling in their endless loops. Walking past one such display by Microduino, Inc. our attention was caught by a demonstration of their mCookie modules in action: installing a peripheral module took less than a second with a “click” of magnets finding each other.
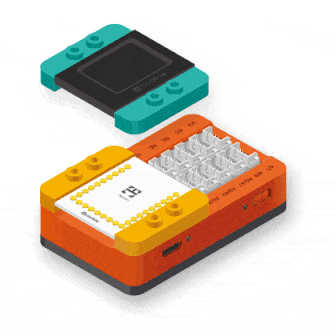 Many Arduino projects draw from an ecosystem of Arduino shields. Following that established path, Microduino had offered tiny Arduino-compatible boards and peripherals which connected with pins and headers just like their full-sized counterparts. Unfortunately their tiny size also meant their risk of pin misalignment and corresponding damage would be higher as well. mCookie addresses this challenge by using pogo pins for electrical contacts, and magnets to ensure proper alignment. Now even children with not-quite-there-yet dexterity can assemble these modules, opening up a market to a younger audience.
Spring loaded electric connections are a popular choice for programming jigs, and we’ve seen them combined with magnets for ideas like modular keyboards, and there are also LittleBits for building simple circuits. When packaged with bright colorful LEGO-compatible plastic mounts, we have the foundation of an interesting option for introductory electronics and programming. Microduino’s focus at Maker Faire was promoting their Itty Bitty Buggy, which at $60 USD is a significantly more affordable entry point to intelligent LEGO creations than LEGO’s own $300 USD Mindstorm EV3. It’ll be interesting to see if these nifty mCookie modules will help Microduino differentiate themselves from other LEGO compatible electronic kits following a similar playbook.
from Hackaday https://ift.tt/2FCMUV4
Comments
Post a Comment