
Blisteringly Fast Machine Learning On An Arduino Uno

Even though machine learning AKA ‘deep learning’ / ‘artificial intelligence’ has been around for several decades now, it’s only recently that computing power has become fast enough to do anything useful with the science.

However, to fully understand how a neural network (NN) works, [Dimitris Tassopoulos] has stripped the concept down to pretty much the simplest example possible – a 3 input, 1 output network – and run inference on a number of MCUs, including the humble Arduino Uno. Miraculously, the Uno processed the network in an impressively fast prediction time of 114.4 μsec!

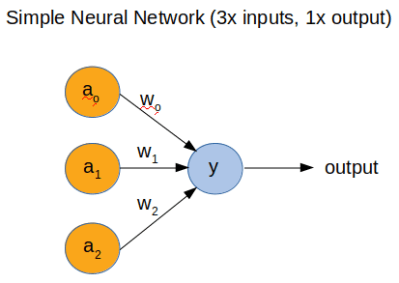
Whilst we did not test the code on an MCU, we just happened to have Jupyter Notebook installed so ran the same code on a Raspberry Pi directly from [Dimitris’s] bitbucket repo.

He explains in the project pages that now that the hype about AI has died down a bit that it’s the right time for engineers to get into the nitty-gritty of the theory and start using some of the ‘tools’ such as Keras, which have now matured into something fairly useful.

In part 2 of the project, we get to see the guts of a more complicated NN with 3-inputs, a hidden layer with 32 nodes and 1-output, which runs on an Uno at a much slower speed of 5600 μsec.

This exploration of ML in the embedded world is NOT ‘high level’ research stuff that tends to be inaccessible and hard to understand. We have covered Machine Learning On Tiny Platforms Like Raspberry Pi And Arduino before, but not with such an easy and thoroughly practical example.


from Hackaday https://ift.tt/2RKhHnP

Comments

Popular posts from this blog

How To Play Doom – And More – On An NES

Doom was a breakthrough game for its time, and became so popular that now it’s essentially the “Banana For Scale” of hardware hacking. Doom has been ported to countless devices, most of which have enough processing ability to run the game natively. Recently, this lineup of Doom-compatible devices expanded to include the NES even though the system definitely doesn’t have enough capability to run it without special help. And if you want your own Doom NES cartridge, this video will show you how to build it . We featured the original build from [TheRasteri] a while back which goes into details about how it’s possible to run such a resource-intensive game on a comparatively weak system. You just have to enter the cheat code “RASPI”. After all the heavy lifting is done, it’s time to put it into a realistic-looking cartridge. To get everything to fit in the donor cartridge, first the ICs in the cartridge were removed (except the lockout IC) and replaced with custom ROM chips. Some modifica...

The Flexible Permanence of Copper Tape Circuits

Somewhere between shoving components into a breadboard temporarily and committing them to a piece of protoboard or a PCB lies the copper tape method. This flexible Manhattan-style method of circuitry formed the basis for [Bunnie Huang]’s Chibitronics startup, and has since inspired many to stop etching boards and start fetching hoards of copper tape. [Hales] hit the ground running when he learned about this method , and has made many a copper tape circuit in the last year or so. He offers several nice tips on his site that speak from experience with this method, and he’ll even show you how to easily work an SMD breakout board into the mix. Generally speaking, [Hales] prefers plywood as the substrate to paper or cardboard for durability. He starts by drawing out the circuit and planning where all the tape traces will go and how wide they need to be. Then he lays out copper traces and pads, rubs the tape against the substrate to make it adhere strongly, and reinforces joints and laps w...

The Newbie’s Guide To JTAG

Do you even snarf? If not, it might be because you haven’t mastered the basics of JTAG and learned how to dump, or snarf, the firmware of an embedded device. This JTAG primer will get you up to snuff on snarfing, and help you build your reverse engineering skills. Whatever your motivation for diving into reverse engineering devices with microcontrollers, JTAG skills are a must, and [Sergio Prado]’s guide will get you going. He starts with a description and brief history of the Joint Test Action Group interface, from its humble beginnings as a PCB testing standard to the de facto standard for testing, debugging, and flashing firmware onto devices. He covers how to locate the JTAG pads – even when they’ve been purposely obfuscated – including the use of brute-force tools like the JTAGulator . Once you’ve got a connection, his tutorial helps you find the firmware in flash memory and snarf it up to a file for inspection, modification, or whatever else you have planned. We always apprec...